About a year ago one of our wonderful and inquisitive staff, Roxie, started experimenting with growing ferns from spores. It has been amazing to observe the young ferns that have since grown at Sage!
Before we get too far into the details of propagating ferns, it is important to know that ferns are not flowering plants and therefore do not ever produce flowers or seeds. Ferns are ancient in evolutionary terms compared to flowering plants, but definitely share many characteristics including vascular structures to move water and nutrients, photosynthesis, and a sexual process for reproduction. Ferns have endured on Earth because they remain very well adapted to low light and moist environments, conditions that can be challenging for flowering plants.
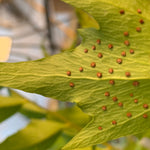
There are a number of lovely "ferny" plants, such as Asparagus ferns, that are imposters - that is, they are actually flowering plants that produce seeds rather than spores (but otherwise look like a fern). So, if you take the info from this article to start your own plants, you'll need to look for the telltale sign of a true fern: those big and possibly concerning-looking dots that develop on the leaf undersides! These contain spores.
Mature ferns bear spores at different times of the year with a trend towards the warmer months (or year-round on houseplant ferns). Outdoor ferns can be started using the info described here, but of course, only produce spores during the active growing season.
When first visible the spore structures are called sori, which are typically a light colour and flat against the leaf bottoms. The arrangement of the sori is species-unique making them an excellent tool for identifying fern specimens. Over the course of several months, the sori will become darker and raised, signs that the spores are ready to be released. When the dusty spores easily tap out from the sporangia (spore-generating structures within the sori) it means it is time to plant!
Ferns have a remarkable reproductive process that involves two completely different phases, similar to insects metamorphosing. Initially, a moss-like plant develops; these are called the prothalli. Although it is easy to think of the spores as the "seeds" of the fern, it is actually the prothalli that are the reproductive structures and contain both the egg and sperm to create future ferns. After a period of development (which typically lasts many months), the prothalli are ready and fern sperm are able to float away from their host and find eggs located in other prothalli. If this sounds very much like sex-ed 101 you'd be correct!
Once successful fertilization takes place the significantly more plant-like baby ferns begin to grow. These quickly become recognizable as young ferns, with leaves, roots, and eventually fronds. Different species will develop at different rates, but there is nothing fast about all of this.
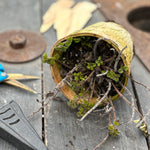
The actual planting of the fern spores is not complicated. The steps are:
(1) determine that the spores are ready
(2) prepare a small container with moistened potting mix
(3) place a leaf with mature spores onto the soil surface, with the sori touching the soil or tap the spores onto the soil
(4) mist the soil
(5) place everything into a Ziplock bag and close
(6) label and date
(7) place the project in a warm location with diffuse light.
If you placed the full leaf onto the soil, remove this after a few days (you should see orange spores left on the soil after you lift the leaf away). It is important to occasionally check on the moisture and spray to keep things very humid, but otherwise, the project just has to sit and do its thing. The container will stay in the Ziplock until it is time to transplant (this may be up to a year).
So, this project requires patience but is super interesting both in terms of a little plant geek-out and also for the opportunity to multiply some really cool plants for your collection.


